Kimberbell Clear Blue Tiles: Know Your Hoops

Did you read my recent Kimberbell Clear Blue Tiles: Know Your Tiles post? I thought I'd follow up with a second installment on these remarkable tools!
Knowing your tiles is important, but so is knowing your hoops, including embroidery field sizes and using your template grid.
The more you understand Kimberbell Clear Blue Tiles, the easier it is to Experience the Joy of Creativity® to the fullest! 😊
![]()
Embroidery Fields vs. Hoop Sizes
Now, if you’re new to machine embroidery, you might be thinking that your hoop size is the same thing as your embroidery field.
After all, the hoop size is how big a design can go, right?
Well...not quite. In order to accommodate the mechanics of the presser foot and needle, the embroidery field is always smaller than the physical hoop. Why?
The machine simply cannot stitch too closely to the edge of the inner hoop without colliding, so there must be a buffer on all sides of the embroidery design.
Because of this, it's important to know your hoop’s embroidery field size in order to know which Clear Blue Tiles fit your hoop.
To find your hoop's exact embroidery field size, please refer to your embroidery machine's user manual, visit the manufacturer's website, or talk to the shop where you purchased your machine.
Here's an illustration that may help:
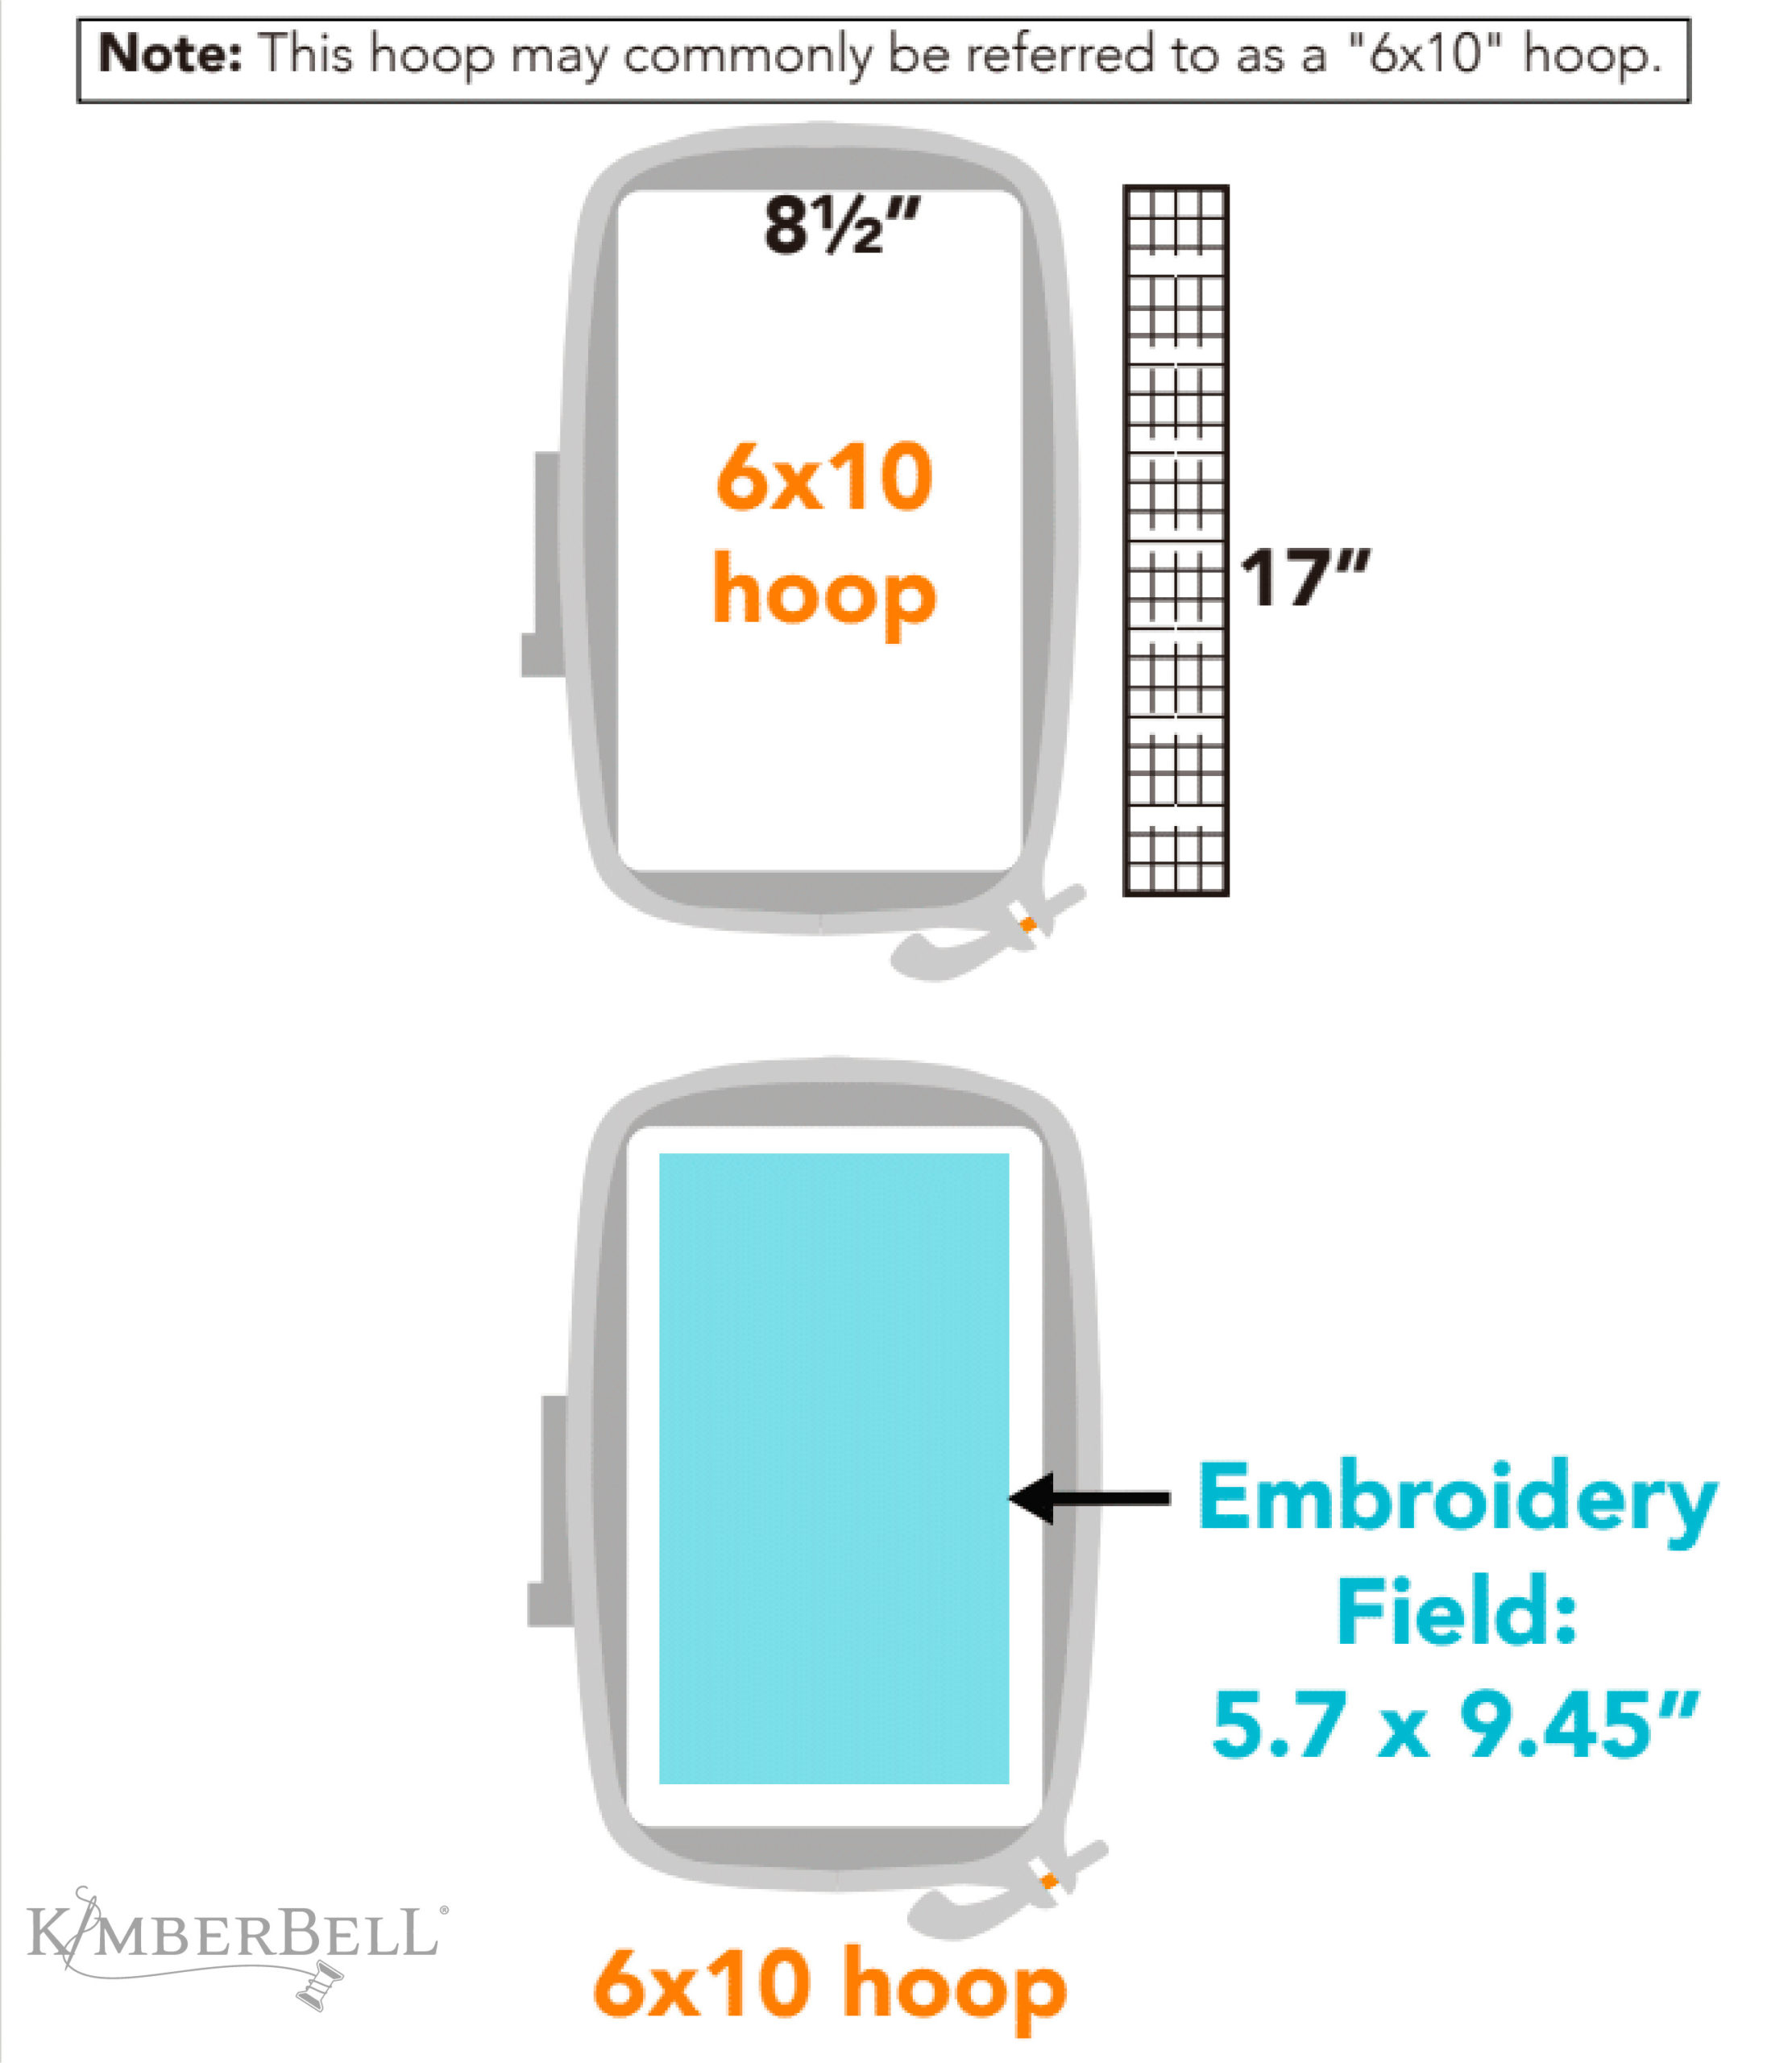
Depicted above is a 6x10 hoop. Notice that the hoop itself actually measures 8 1/2 x 17" and the embroidery field is 5.7 x 9.45". See what I mean? It's a lot smaller!
The thing you need to pay attention to is the embroidery field size represented in blue.
For example, if you have a 6x10 hoop with an embroidery field size of 5.7 x 9.45", the following tiles will fit in your hoop:

![]()
Filling Out Your Chart
I know that all of this can seem a little confusing. But never fear—we've come up with a simple way for you to figure out what works for your machine!
This table comes with the User Guide in the Clear Blue Tiles Essentials Set. (Please see page 8.)
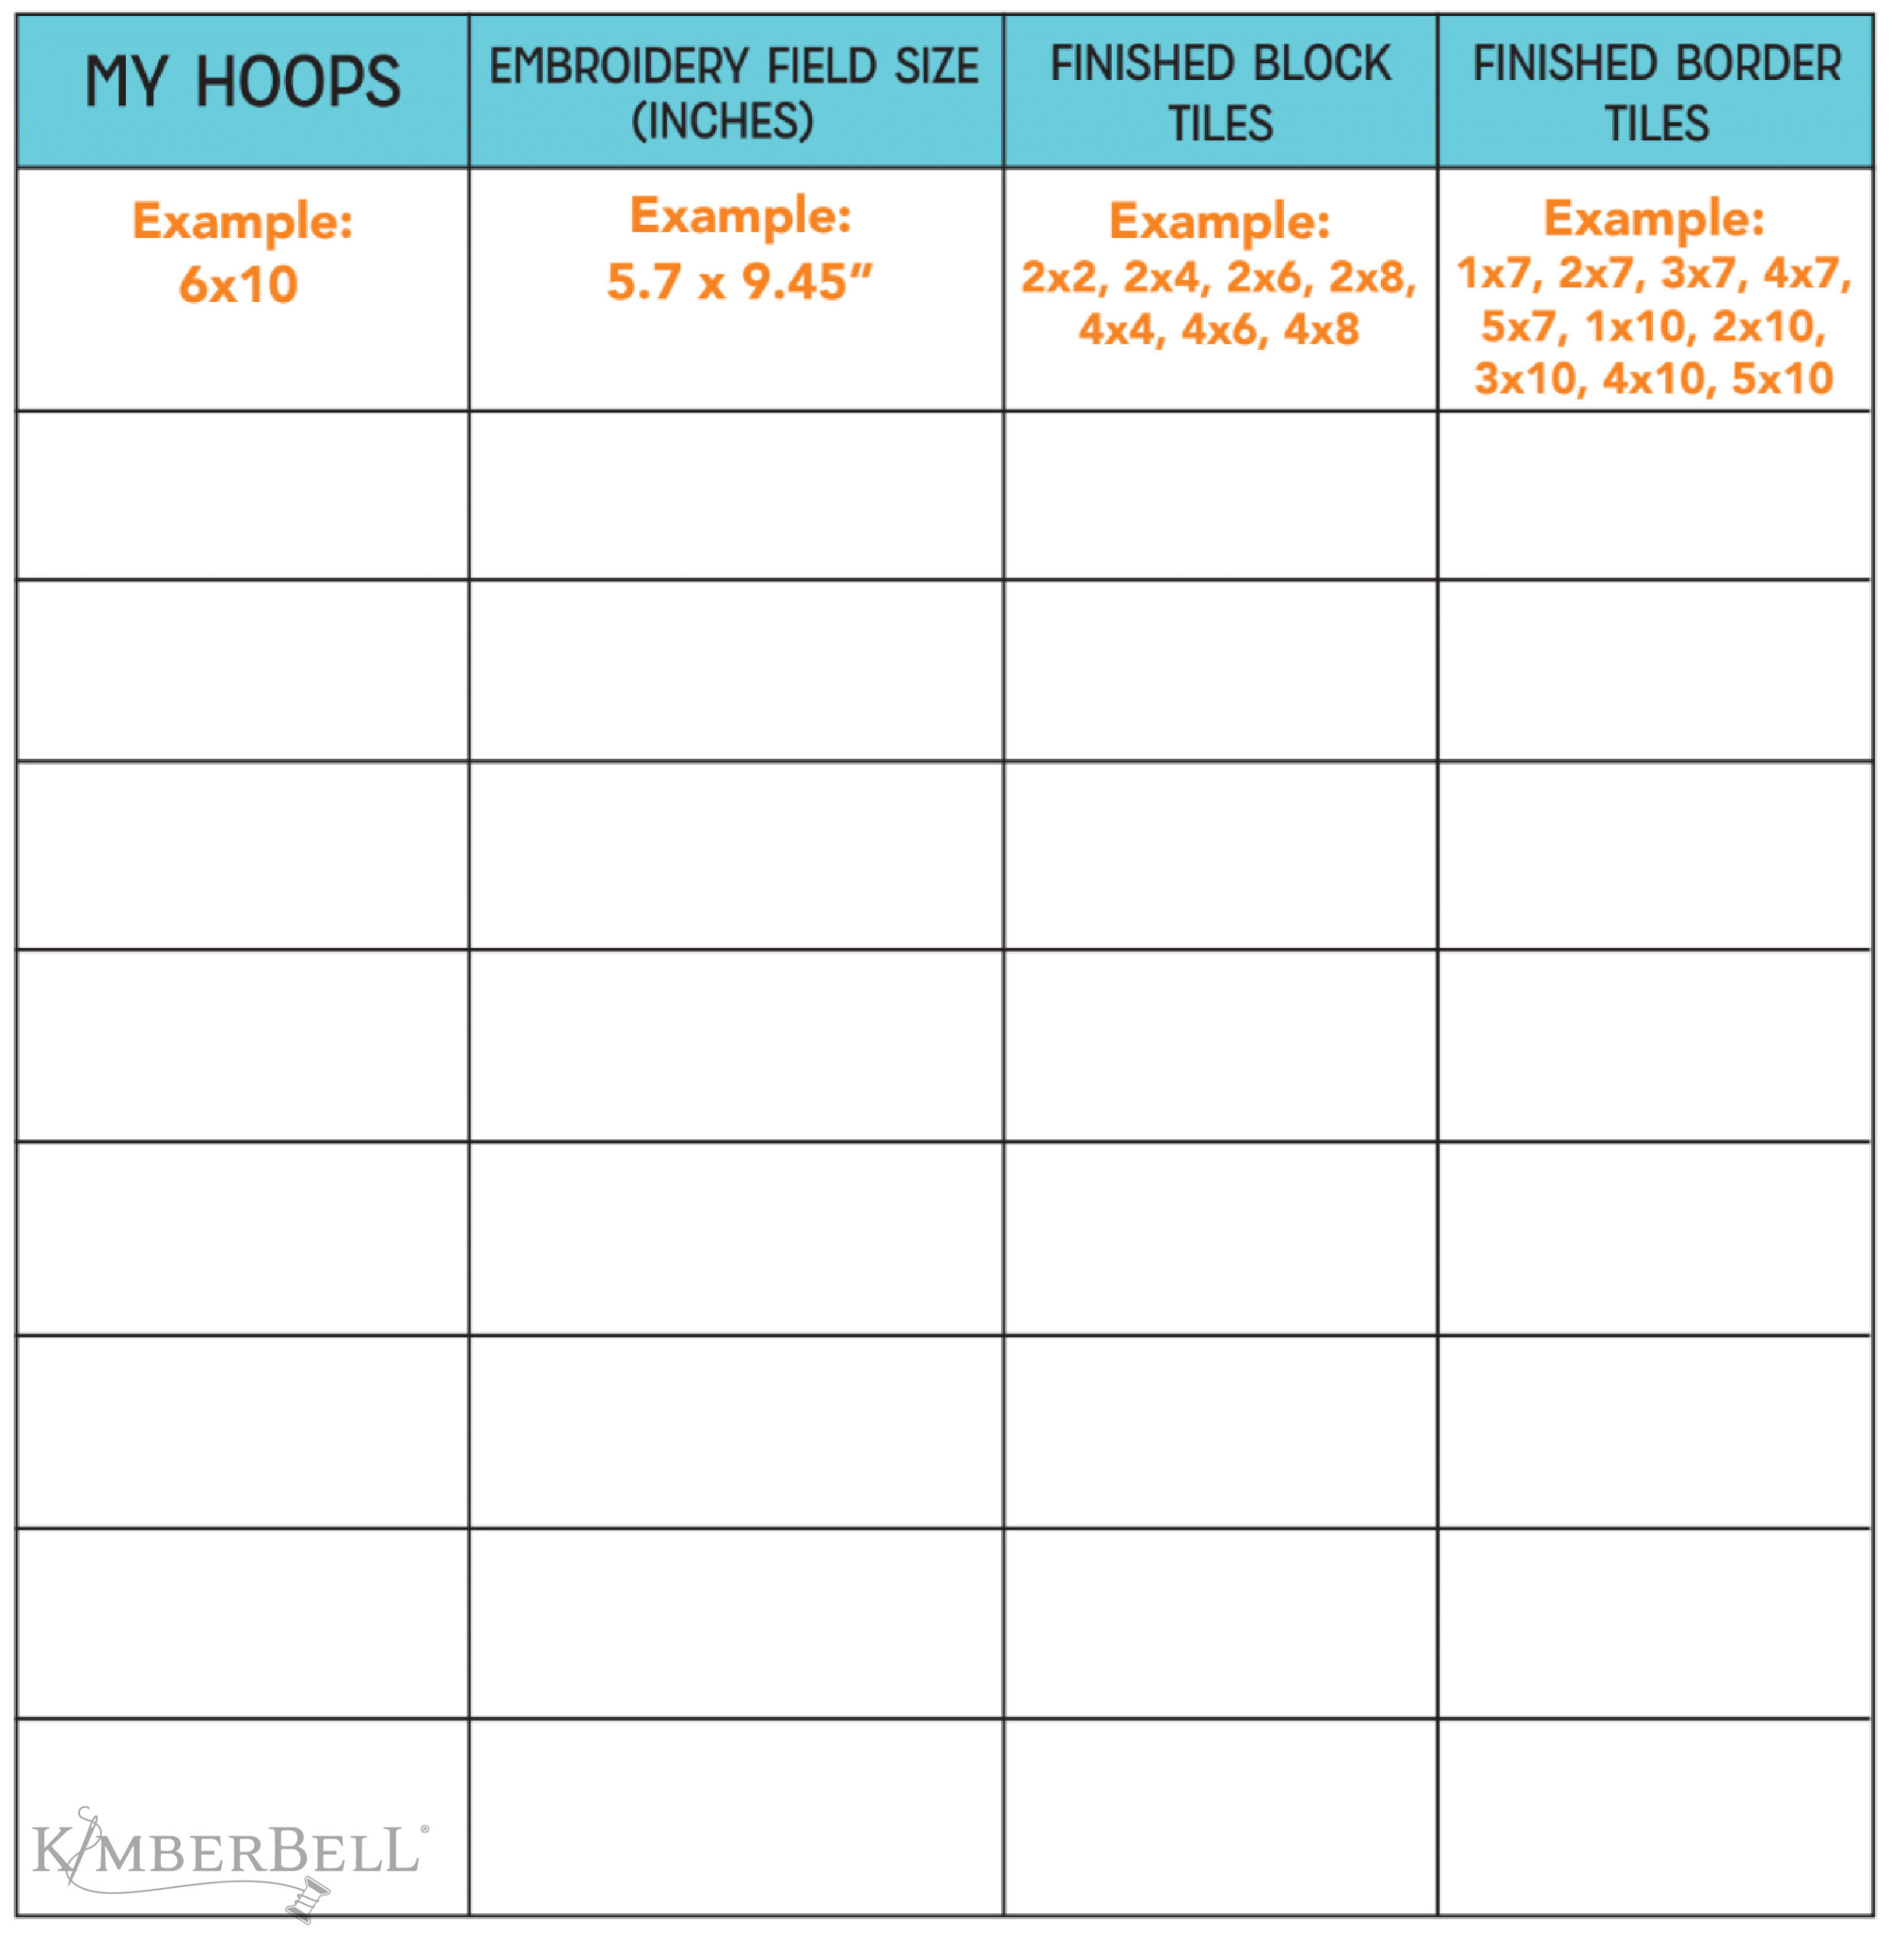
Fill out your chart by:
- Listing the size of each embroidery hoop you own and its embroidery field size in inches. (Refer to the embroidery machine’s user manual or visit the machine manufacturer's website to find hoop embroidery field sizes.)
- Checking the Clear Blue Tiles Embroidery Field Sizes table on page 9 of the User Guide to see which tiles will fit in each hoop. This will help you know what tiles to choose for quilting. (Remember, the tile's design file embroidery field size must be smaller than the hoop’s embroidery field size!)
- Writing the tile size that corresponds with each hoop in the table.
Once you've filled out the table, you'll be able to quickly reference which tiles can be used for which hoop. 😊
Here's a helpful rundown of some common hoop sizes with their respective embroidery fields. (Note: Please still see your specific machine's user manual to double-check!)
| HOOP SIZE | EMBROIDERY FIELD |
| 4x4” |
3.94” x 3.94” (100mm x 100mm) |
| 5x7” | 5” x 7” (127mm x 177.8) |
| 6x10” | 5.7” x 9.45” (144.78mm x 240.03mm) |
| 8x8” | 7.87” x 7.87” (200 mm x 200 mm) |
| 8x12” | 7.87” x 11.75” (199.90mm x 298.45mm) |
| 9x9” | 9.05” x 9.05” (229.87mm x 229.87mm) |
| 9x14” | 9.4” x 14.1” (238.76mm x 358.14mm) |
![]()
The Template Grid
In addition to knowing your hoop sizes and embroidery fields, you'll also need an embroidery hoop template grid.
This grid is a plastic piece that fits inside the inner ring of the embroidery hoop and is used to find the center of the hoop’s embroidery field.
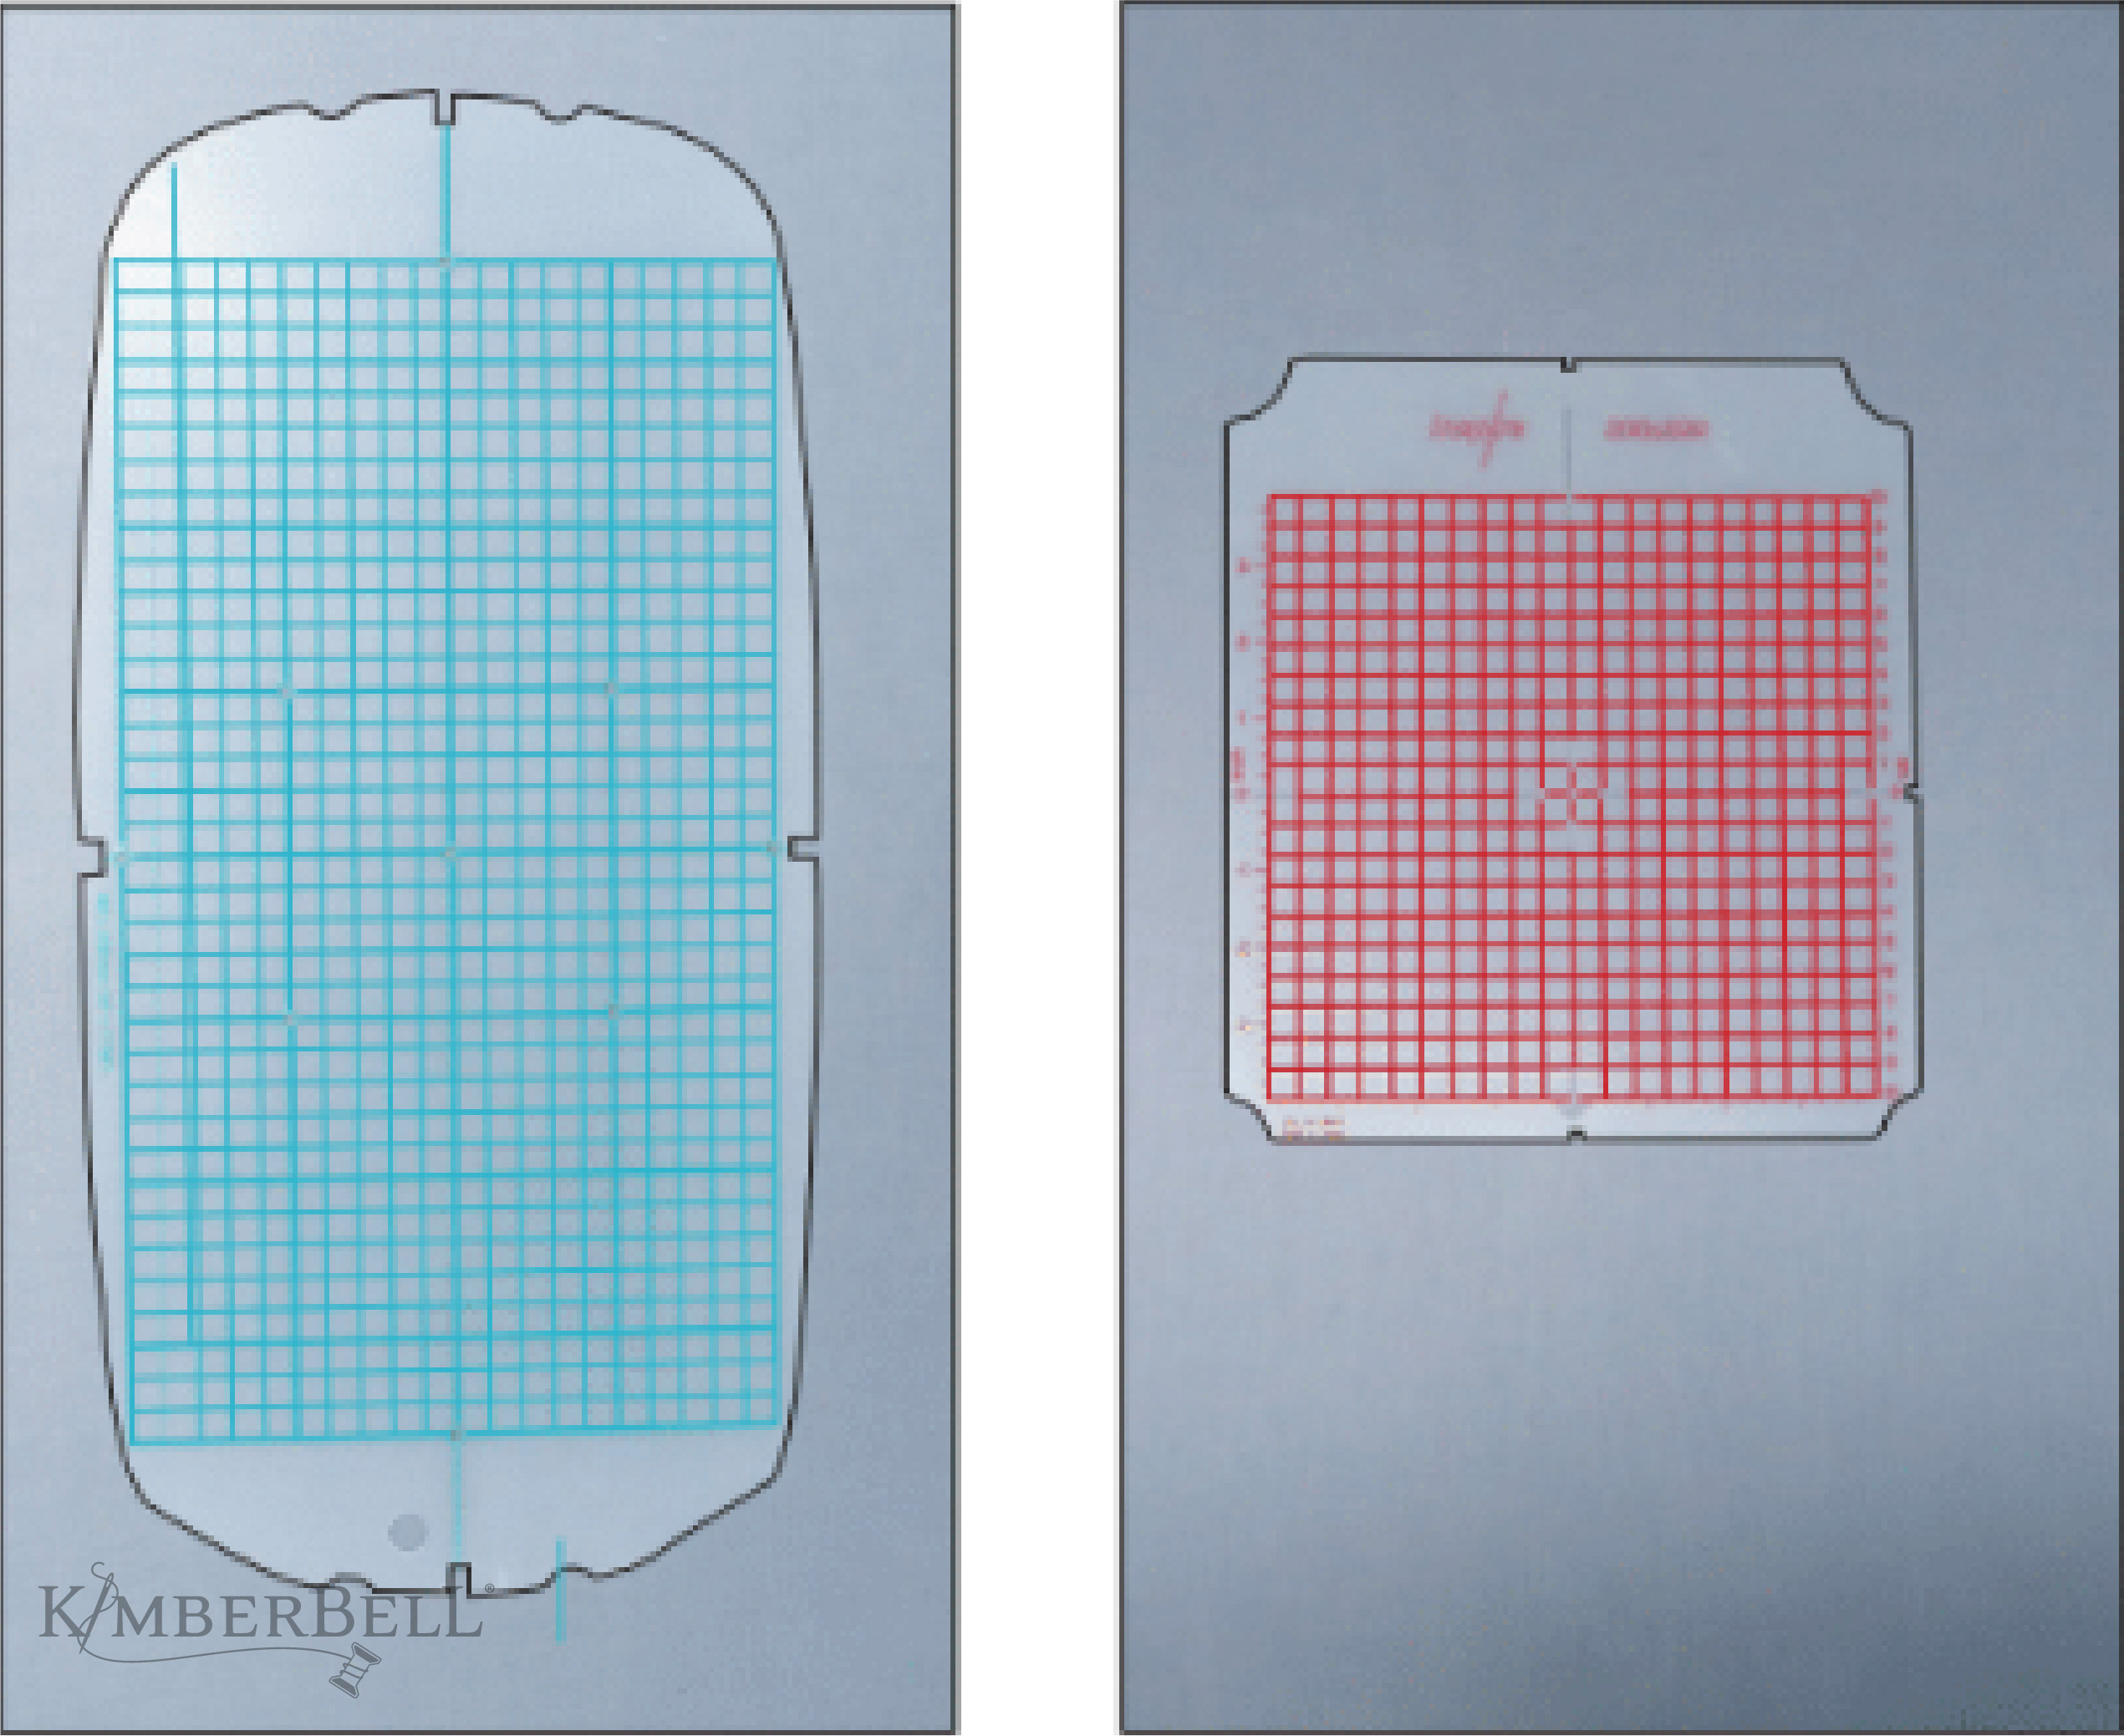
You most likely received this template grid when you purchased your machine. Time to dig it out! (If you no longer have a template grid, keep reading for our simple solution below.)
Here's a review of the above information, as well as a demonstration on using your machine's template grid to center your background quilting file.
![]()
Making Your Own Template Grid
If you don't have a template grid, you might want to ask your favorite quilt shop about it (Maybe they can sell one to you?)
But if not, you can certainly make something that will work with Kimberbell Light Mesh Cut-Away stabilizer.

Here's how:
- Cut a piece of Kimberbell Light Mesh Cut-Away (This stabilizer is transparent, which is important!)
- Hoop and stitch out the Clear Blue Tiles Crosshairs File. (This file is digitized to find exact center of your hoop and embroidery field. It doesn’t matter what hoop size or brand.)
- Find the arrows on your inner and outer hoop rings and make sure that they are perfectly aligned.
- Take a regular writing pen and draw an outline of the inside of your hoop.
- Find the top of your hoop and write “top” right on the mesh stabilizer.
- Cut on the outline (directly on top of the line).
- Match the crosshairs on the mesh template to the crosshairs that you marked on the quilt (tape the mesh onto the fabric so it doesn’t shift).
- Put double-sided sticky tape on the back part of the inner hoop ring and frame the mesh within the ring.
- Place the outer ring behind the quilt and hoop! Remove the mesh template and the crosshairs on the fabric will be centered.
To watch Kim's step-by-step tutorial on making your own template grid, watch the video below!
![]()
Experience the Joy
Once you know which tiles will work with your hoops, the real fun begins as you use Clear Blue Tiles to take every project across the finish line.

The Clear Blue Tiles Essentials Set, the Clear Blue Tiles Expansion Set, and the Clear Blue Tiles Expansion Set 2 can be purchased HERE or through your favorite quilt shop!
Note: Remember to always start with the Essentials Set.
Clear Blue Tiles Seminars
For more information about Kimberbell Clear Blue Tiles, please watch this helpful seminar. It's exciting to think of all you can do with such an easy technique!
![]()
To learn more about Kimberbell's background quilting system, please click HERE.
Happy stitching!


Leave a comment