
Making an Easy Quilt Sandwich

Nothing's better than a quilt. Am I right?
I mean, what do you reach for when you're cold? Quilts. What do you snuggle with when you need comfort? Quilts. What makes your house warm and inviting? Quilts.
Quilts are quite possibly the BEST. INVENTION. EVER. (Other than cookies.) 🙂
Whether you've made quilts for years or this is your first go, below is the stuff you need to know: cut sizes, how to make that famous "quilt sandwich," and how to quilt with Clear Blue Tiles®!
Quilt Cut Sizes
What size of quilt do you want to make? Here's a quick reference guide for common quilt sizes (particularly sizes that are perfect for gifts and donations)!
Pssst . . .the reason I'm focusing on these particular sizes is because of our upcoming Tiny Hugs initiative. (Stay tuned for more details . . .they're coming soon!) 💕
.jpg)

Quilt Sandwich Ingredients
Once you've determined the size, it's time to make THE "quilt sandwich."
The quilt sandwich consists of top and bottom layers of fabric (bread, if you will) with a good layer of batting in between. Here are some tips on creating the perfect quilt sandwich!

Top Fabric
Cut your fabric to the desired size. Press the quilt top so all seams are flat and fabric is wrinkle-free!
Batting
Match the size of the batting to the size of your quilt top PLUS allow an extra 1" on all sides. We strongly recommend Kimberbell Project Batting, which has the ideal loft for quilting in-the-hoop!
Tip: If you need to use more than one piece of batting to make it larger, be sure to zigzag stitch the pieces side-by-side so the quilt lays flat!
Back Fabric
Your back fabric should be the size of your quilt top PLUS an extra 3" on all sides. (This extra back fabric allows room for hooping and for embroidering the design off the edge of the quilt top.) Press well!
Assembling Your Quilt Sandwich
Below are step-by-step instructions and illustrations for putting your quilt sandwich together!
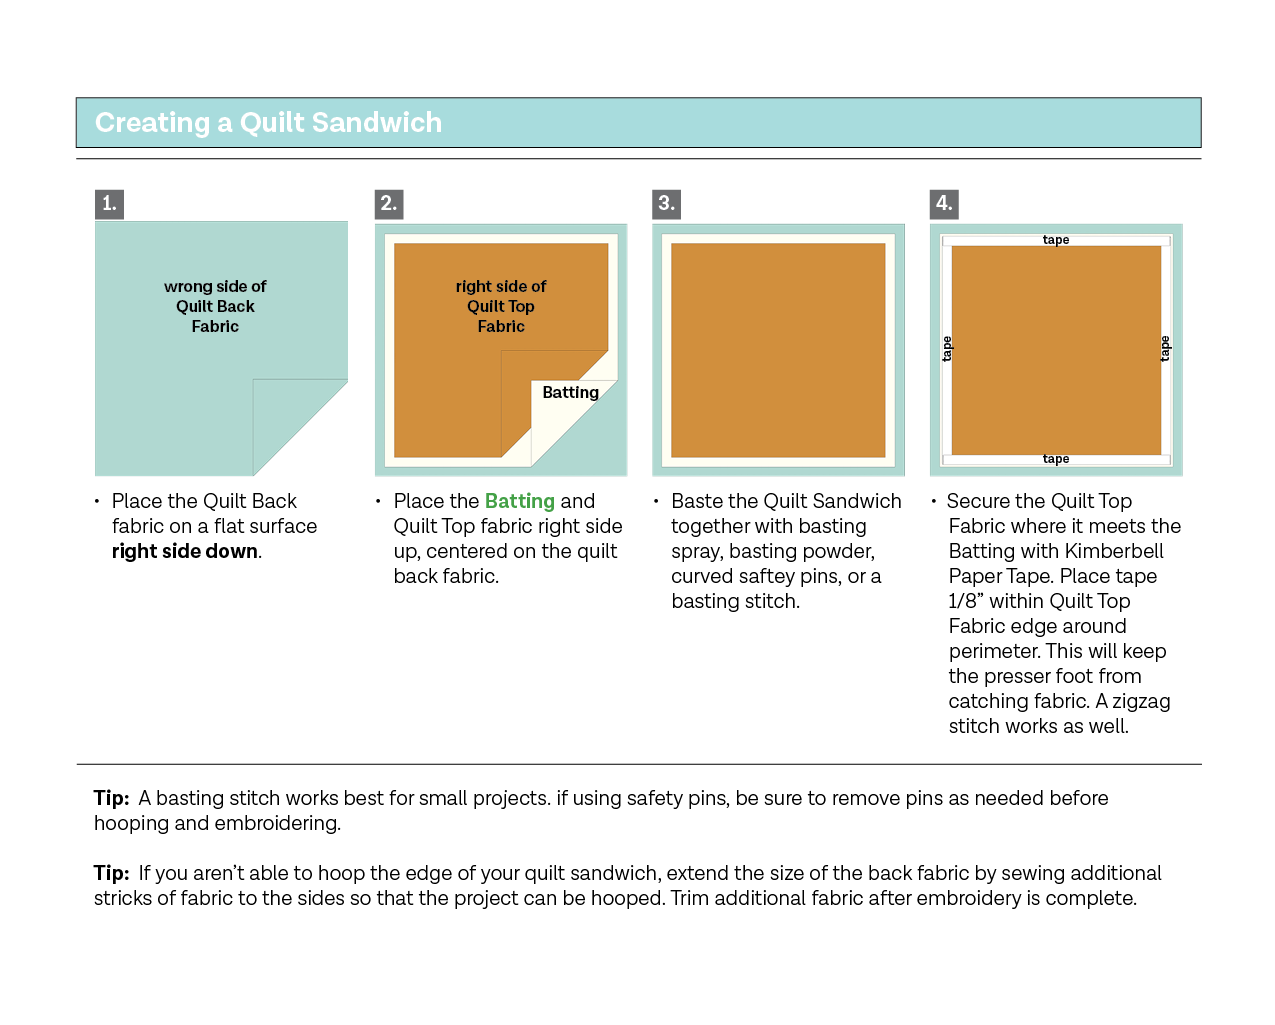
Using Clear Blue Tiles
These remarkable tools make it possible to create continuous, all-over quilting, just as if you stitched your project on a longarm machine (but you actually used your home embroidery machine)!
First, you'll place one of the Clear Blue Tiles on top of your quilt sandwich. Next, you'll use a water-soluble pen to mark the fabric as directed. (The included User Guide will walk you through each step!) 😀
It's a lot like using a rubber stamp. Place the tile and mark your fabric. Then move the tile, align with previous markings, and mark again. Repeat until you've "stamped" the fabric all over, indicating where quilting will go.

After you've marked your fabric, you'll hoop it, making sure your needle is aligned with the center crosshairs. You'll then stitch the corresponding embroidery file that matches the tile size you used.
It's that simple!
When stitching is complete, hoop your fabric again with the next "stamped" marking and continue the process until the entire project is quilted. Couldn't be easier! 😊

Tiny Hugs




Leave a comment